12 Sep DIY Tutorial: How to Paint “Dipped” Furniture
If you are feeling super inspired by yesterday’s post, you are sure to feel empowered to grab that boring table or stool or chair after today’s DIY Tutorial! Dipping furniture is not difficult – if you are a novice, you need not fear. Please note I am doing a reverse dip here, so if you want to actually “dip” chair legs or spoon handles, etc., check out the tutorials here and here and here.
As much as I would love to tell you these were for me, I cannot. (wink, wink) These benches were purchased from Gypsy Soul by our client, Sabrina.
Quick Side Note/Shameless Plug: have you checked our new items lately or visited Scout Design Studio at 155 Howell Street in Dallas, open daily from ten to six to see Gypsy Soul’s items in person?
Sabrina was so fun to work with because she has an artistic eye and could look past honey wood and dated floral fabric to the gem just waiting to be revealed.
After asking me to put together design boards for her casual living room and formal living room, we got to work readying the rooms in preparation for her son’s birthday party. We pulled these rooms together in two weeks, and they looked incredible! Stay tuned for the design boards and big reveals…
First things first, I sent the bench seats to my trusty upholsterer. Yes, it was just two bench seats, but time was limited so I opted to spend the money on upholstering them and decided to paint the benches myself. Not too long ago, I snagged a couple of yards of this beautiful Apple Green Sunbrella velvet for $15 on HouseFabric.com.
Sabrina and her hubby have two little ones and a dog so I loved the Sunbrella option since I knew it would be luxurious AND super durable. (Side Note: Sunbrella velvet is usually fairly expensive so grab it when you can find a good price on it. There are a few good options here!) I found the navy linen for the welt on the seat at Joanns, and decided to tuft the benches to add a little more elegance to them.
Then came the painting! Since Sabrina wanted navy to be a focal color for both rooms, I picked up a quart of Benjamin Moore’s Hale Navy in the Advance line in High Gloss. I really like the Advance line and have used it for several projects now. One thing I really appreciate about it is it has many of the positive points of using oil-based paint on furniture (wears well, retains its shine, etc.), but it is actually water-based. It does take a few days to truly cure though so keep that in mind.
Pulling out my handy blue painters tape, I had to decide how far I wanted the wood to be exposed on the legs. Four inches ended up being my magic number.
After marking each leg with a pencil, I went back and carefully taped every leg, making sure I had them fully covered. (You don’t want any spray paint dust slipping in the cracks!) For the top of the legs, where it was most important for the line to be crisp, I took extra care to press the tape down firmly. When I placed a strip of tape on each face of the leg, I wrapped a small amount of tape to the other side and applied the rest of the tape in small sections to ensure even straight lines.
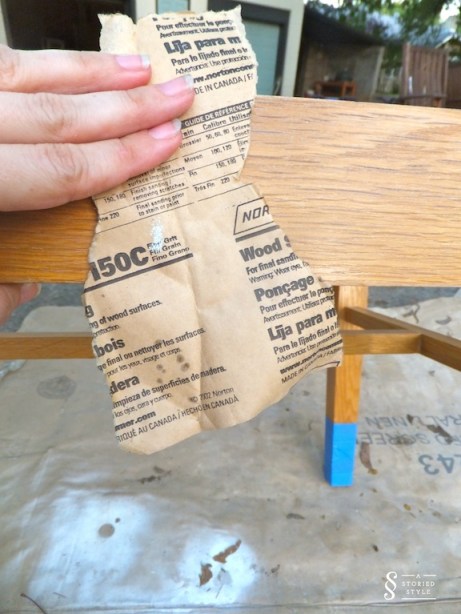
A light sanding allowed the paint to better adhere to the wood.
I used Valspar Spray Primer for a quick prep coat.
I decided to use a foam brush for this project. For one thing, it forces me to apply even, thin coats, and I wasn’t worried about the finish not being glossy enough since the Advance High Gloss line from Benjamin Moore is super shiny. (sometimes I feel foam brushes dull the finish of the paint I’m using)
As you can see, the party moved inside by this point. It was getting late! I believe I used five thin coats of paint which was probably overkill, but I wanted to make sure it was well-coated. I made a concerted effort to allow the paint to dry between coats which was fairly easy since the foam brush only permits thin coats.
Finally, it was time to take the tape off!
I did have a few little places where the paint had bled onto the wood, and the line was not perfectly straight. A couple of Q-tips and some nail polish remover fixed that problem! I also applied some wood polish on the wood to ensure it looked its best.
After I put the newly upholstered seats back on the top of the benches, I was so pleased with the end result! Take a look!
What do you think? Is there something in your home waiting for you to “dip”?
Come back tomorrow for this room’s design board and full makeover!


Papa Buck
Posted at 06:42h, 12 SeptemberI would recognize those paint covered hands anywhere. Looks great.
Grace
Posted at 04:45h, 13 SeptemberHa! Thanks Papa Buck. 🙂 Thanks to you, they are no longer paint covered. Thanks again for the special dirt soap. 🙂
Jennifer
Posted at 07:01h, 12 SeptemberThose look fabulous! I have the hardest time seeing the potential in pieces like that, but seeing their transformation is so helpful.
Grace
Posted at 04:46h, 13 SeptemberOh thanks, Jennifer! I think they turned out great, too. They started out snoozeville and ended up so fab!