
26 May DIY Tutorial: How To Clean (Really Really Dirty) Brass Hardware

Hello Friends, pardon my absence the last couple of weeks while we wrapped up school (which was way busier than I imagined – whoosh!) and dealt with our porte cochere ceiling collapsing on our car (more on that later), not to mention my continued recovery (I’m feeling much better by the way, and am very close to being released by my doctors!).
This past Saturday, I finally sat down to tackle a task I had been needing to work on for quite some time – cleaning the hardware on the campaign built-in for our Master Bathroom.
This is a “before” picture, and this vintage campaign piece turned bathroom built-in, purchased at Scout Design Studio in Dallas, has had a major face lift since the photo below was taken.

scout design studio
As you can see, there is A LOT of hardware to be cleaned here. Over 50 pieces…But I was undeterred at the beginning. After all, this is not my first go-round at cleaning campaign hardware. I’ve done it millions of times.
I promptly pulled out my Brasso and started scrubbing. At first, I did not remove the campaign hardware from the main piece, simply because those brass T’s and L-shaped pieces are a beating to get off without bending them. (I often recommend not removing campaign hardware for this very reason) However, after scrubbing and scrubbing with Brasso, I quickly realized this was not going to be an easy job. Therefore, all of the hardware was removed from the furniture piece very, very carefully. Once I had all of the brass hardware on a flat surface, I switched to Bar Keepers Friend and started scrubbing. I was surprised, yet again, to see my cleaner was not denting this grime at all.
So that’s when I decided to pull out all the stops. If you have beyond dirty brass hardware, these are the steps you need to take to ensure the quickest, most efficient way of bringing these brass beauties back to life.
Step 1: Fill a plastic container you never want to eat out of again with ammonia. I know, I know, I do not use heavy duty chemicals like this much in my life, but sometimes, you need to use strong chemicals to get the job done.

I dumped all of my brass hardware into the ammonia and let it soak for thirty minutes or so. You may be able to get by with less, you just need to experiment a little. I knew my hardware was ready when I could take it out, scrub lightly but firmly, and the gunk would come off. Make sure you wear rubber gloves since you are dealing with strong chemicals.
Side Note: All of this hardware is solid brass so I knew I could be a little rougher with it versus hardware that is brass plated. Brass plating is thinner, and you need to be more gentle when cleaning it. It probably could not sit in ammonia very long. (although you need to really watch your brass whether it is solid or plated as it sits in the ammonia – if you let it sit too long, the brass can get these weird, pink spots so check it every few minutes or so.) How do you know if your hardware is solid brass or brass plated? Easy. If a magnet sticks to it, it is brass plated. If not, you have yourself a solid brass piece.

Step 2: Take your hardware out of the ammonia one piece at a time (or you can take it all out if it is ready), squirt a small amount of liquid form Bar Keepers Friend on it, and scrub it with level 0000 steel wool
(or a very fine grade of steel wool, nothing too abrasive as you do not want to scratch the brass). Wipe dry with a soft cloth or paper towel. You will probably have to rinse your campaign handles with water, but you can just wipe your T’s and L-shaped pieces with a cloth/paper towel.

*Couple of side notes here: This was my first time using the liquid form Bar Keepers Friend, and I LOVED it! I have always bought the powder form and mixed it to make my own paste, and I felt the liquid version was much, much more user friendly. Also, while I liked using the steel wool
for the face of the hardware, when it came to the inset part of the campaign handles, there was tons of gunk in there, and an old toothbrush was really the best tool to clean it. The head of an old toothbrush could get in the corners and scrape away grime in a way steel wool could not.
Step 3: Polishing! I used my Old Faithful, Brasso, to clean any leftover residue or spots. I placed a pea size amount on each piece of hardware and rubbed it with a paper towel.
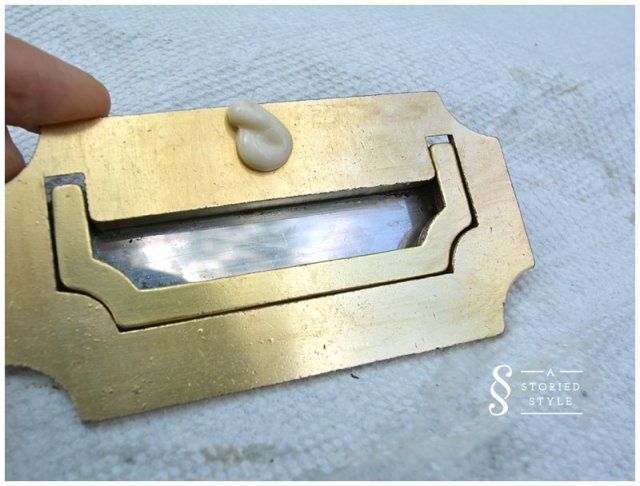

You would think after all of this that there would not be much grime to clean, but I was surprised to see all the black that was showing up on my paper towel.


*Side Note: Make sure you have the outside edges of your campaign handles clean as they will show when your hardware is installed.
After I cleaned the brass with the Brasso and wiped it away, I used a clean paper towel to make sure it was dry and free of any leftover film. And then, I was done! Now repeat times fifty pieces of brass hardware.

Several hours later, with a sore pair of hands and shoulders and arms, I was done. The hardware was restored to its original, beautiful brass glow. Yes, it was a pain to clean, and I am fairly sure it had never been touched which means at least sixty years of dirt. But whoa, what a difference!

Really though, if I had had this step-by-step plan when I started cleaning the hardware, it would have been much quicker and easier, and I would be much less sore as I sit here typing this. The ammonia was really key – once I let the hardware soak, clean-up was swift.
It was a hard job, a dirty job, but my campaign built-in in the Master Bathroom is going to look sooo much better when all of this is installed. Plus this is one of those projects you can feel proud about when you look back. Maintenance of this type of brass hardware is not difficult at all in my experience. On my campaign dresser in the living room and unlacquered brass kitchen hardware, I go over the brass with Brasso about once a year, and I am done in a few minutes. Just like with lots of things in life, maintenance is quick, it’s catching up that is hard.
So now you know how to clean really, really, really, dirty brass hardware. There is hope, my friends…whether you have a piece in your garage that has been sitting there longer than you want to admit, or you have always loved this brass look but did not know what you needed to do to get there, I hope this step-by-step plan has helped!
At least it will save your arms from falling off and your fingers from turning into knubs.
In case you are just joining us, here is a list of posts of the Master Bathroom renovation from the beginning. These posts are in order, and we are five and a half months in (and still not done, this was a total gutter).
The Original 1921 Bathroom + The Plan
How We Found Our Antique Barber Shop Sink
Gutting The Bathroom, Tile, & Ideas
Wood & Marble Floor Installation

Emily
Posted at 08:42h, 26 MayThis was great. Really and truly, I loved knowing all of this. And, I had no idea about the magnet trick. Thanks Grace!
Grace
Posted at 12:57h, 29 MayThanks Emily! The magnet trick is pretty cool, huh? 🙂 Thanks so much for reading. Hope you’re having a great day! xo, G
Frances @ Improvement List
Posted at 12:11h, 26 MayI just love the look of campaign furniture. I am always on the look out for it when I have the time to check out thrift stores. One of these days I will find one! I am pinning this tutorial so I will know how to clean the brass. Thanks for sharing this.
Grace
Posted at 12:59h, 29 MayHey Frances, I’m sending you lots of well wishes to find your campaign piece! I wish I lived nearby, there are usually some good options around here. Plus I have a few in my garage. 🙂 Good luck! Thanks for your comment. xo, G
Melissa
Posted at 18:52h, 10 JuneIf you want to avoid the ammonia I have another trick. I get old stew pots at thrift stores (ie– you never want to cook in these after you do this) and do a mix of water and white vinegar (about 3/4 water to 1/4 vinegar.) Boil it on the stove for 15-20 minutes, and as each piece comes out of the pot (I use tongs to pull them out) rub them with Barkeeper’s Friend and lay out to dry. It takes off the really heavy-duty dirt and grime!
Grace
Posted at 20:23h, 10 JuneOooooo, Melissa! I will definitely try this next time! Thank you! xo, G
susie
Posted at 07:29h, 21 JulyThank you for this information! I have several old pieces of brass hardware from our c. 1938 house and plan to try your “recipe”… and your whole site is wonderful and I have bookmarked it 🙂
Grace
Posted at 15:29h, 22 JulySusie, you are so welcome! I’m sure it will brighten them up beautifully! Definitely try the boiling water too like another reader suggested. That works great, too. Let me know how it turns out and if I can help you any further. Thanks for reading, G
Gia
Posted at 06:53h, 27 SeptemberLove your blog! Any advice for dirty silver? :(((
N.McBee
Posted at 09:12h, 17 NovemberThanks for the info! It is pretty useful for me! Cheers!
Marlene
Posted at 07:29h, 16 DecemberYou did a great job there! Thanks for the post! 🙂