

August 7, 2015
DIY Acrylic Hardware For Kitchens + Baths & More
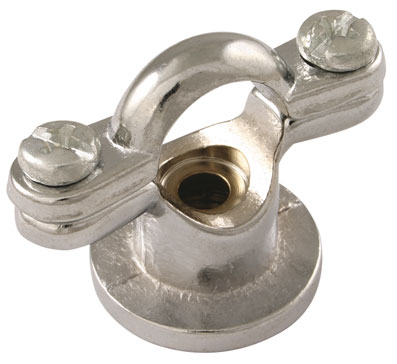
Without a doubt, one of my most popular projects has been my DIY Acrylic Curtain Rods. (some people say lucite, some say acrylic - potatuh, potatah) So imagine my feelings one night when I am searching for hardware for our Master Bath renovation, and I come upon an image of this.
[caption id="" align="aligncenter" width="300"] brass pipe clip[/caption]
Do you see what I see? I instantly thought "I CAN MAKE SOMETHING WITH THIS!" Originally, I was thinking I could put brass rods through these to make some killer hardware, but then I pondered acrylic. It would definitely be cheaper, and since the pipe clips are a little more bulky and industrial looking, perhaps that would be the perfect combination of mechanical and sophisticated.
This is a rather convoluted story, but follow me on the struggle for an idea to come to fruition...
So the next day, I called up my local plumbing supply searching for brass pipe clips. They did not have them, never heard of them. I called several others...nothing. No one seemed to have ever heard of pipe clips; rather, pipe clips that were brass (aka pretty). Finally, I got my answer after calling yet another plumbing supply store (and after he laughed at me when I told him I was looking for brass pipe clips). After sending him the picture, he said, "Oh, these are probably European. In the UK and countries over there, they care about stuff like this. You will never find these here." (WHAT IS WRONG WITH YOU AMERICA?! : ) )
Therefore, I did what I always do when I cannot find something in the States, I go to Ebay UK. My first set of clips I ordered from this seller. They were very nice and easy to work with. Sadly, in the midst of all of our home renovations, the pipe clips got lost. By the time I went back to order, my Ebay UK seller was out of the ones I needed. I had to find another source. Then I found Supreme Plumb. On their site, they tell you they will not ship internationally, but they will. Just email them.
brass pipe clip[/caption]
Do you see what I see? I instantly thought "I CAN MAKE SOMETHING WITH THIS!" Originally, I was thinking I could put brass rods through these to make some killer hardware, but then I pondered acrylic. It would definitely be cheaper, and since the pipe clips are a little more bulky and industrial looking, perhaps that would be the perfect combination of mechanical and sophisticated.
This is a rather convoluted story, but follow me on the struggle for an idea to come to fruition...
So the next day, I called up my local plumbing supply searching for brass pipe clips. They did not have them, never heard of them. I called several others...nothing. No one seemed to have ever heard of pipe clips; rather, pipe clips that were brass (aka pretty). Finally, I got my answer after calling yet another plumbing supply store (and after he laughed at me when I told him I was looking for brass pipe clips). After sending him the picture, he said, "Oh, these are probably European. In the UK and countries over there, they care about stuff like this. You will never find these here." (WHAT IS WRONG WITH YOU AMERICA?! : ) )
Therefore, I did what I always do when I cannot find something in the States, I go to Ebay UK. My first set of clips I ordered from this seller. They were very nice and easy to work with. Sadly, in the midst of all of our home renovations, the pipe clips got lost. By the time I went back to order, my Ebay UK seller was out of the ones I needed. I had to find another source. Then I found Supreme Plumb. On their site, they tell you they will not ship internationally, but they will. Just email them.
Note: When I am shipping items internationally, I always request Expedited Shipping. It is worth the extra few dollars, and trust me, Standard Shipping from other countries these past couple of years has been a nightmare. I bought some art for a client last year, and it was stuck in customs for MONTHS.Just FYI, if you prefer a silver look rather than a gold, pipe clips come in chrome, too. [caption id="" align="aligncenter" width="397"]
 chrome pipe clip[/caption]
The new pipe clips arrived, and I was ready to get started.
Here is what you need...
chrome pipe clip[/caption]
The new pipe clips arrived, and I was ready to get started.
Here is what you need...

 November 2013[/caption]
And here we are now!
November 2013[/caption]
And here we are now!


 July 2012[/caption]
It really is a shame it was in such bad shape, especially after we heard that in the 1920's and 30's, this space was a lovely rose garden that people would stop by and see. Apparently, it had quite the reputation! The previous owners of our home used the area as a dog yard of sorts, so it looked like...a dog yard.
If you have been following this site for a long time (as in since the beginning), you may remember me talking about the space as my "Dream Project".
[caption id="attachment_9073" align="aligncenter" width="640"]
July 2012[/caption]
It really is a shame it was in such bad shape, especially after we heard that in the 1920's and 30's, this space was a lovely rose garden that people would stop by and see. Apparently, it had quite the reputation! The previous owners of our home used the area as a dog yard of sorts, so it looked like...a dog yard.
If you have been following this site for a long time (as in since the beginning), you may remember me talking about the space as my "Dream Project".
[caption id="attachment_9073" align="aligncenter" width="640"] July 2012[/caption]
 November 2013[/caption]
In the next photo, you can see on the right a cost effective solution (much cheaper than wood fencing) for hiding the air conditioner, sprinkler box, and other outdoor items we need to store. We bought those old gates at my favorite local salvage store/yard, and after support was added, they provided a very nice screen for unsightly items.
[caption id="attachment_9069" align="aligncenter" width="640"]
November 2013[/caption]
In the next photo, you can see on the right a cost effective solution (much cheaper than wood fencing) for hiding the air conditioner, sprinkler box, and other outdoor items we need to store. We bought those old gates at my favorite local salvage store/yard, and after support was added, they provided a very nice screen for unsightly items.
[caption id="attachment_9069" align="aligncenter" width="640"] November 2013[/caption]
The gates even came painted the same color as our fence! It was uncanny how perfectly the color matched!
November 2013[/caption]
The gates even came painted the same color as our fence! It was uncanny how perfectly the color matched!

 December 2013[/caption]
But by January 2014, things had perked up a bit. The garden was still pretty bare bones, but it was still winter time, and we knew we would get more plants in the ground in the spring.
[caption id="attachment_9066" align="aligncenter" width="640"]
December 2013[/caption]
But by January 2014, things had perked up a bit. The garden was still pretty bare bones, but it was still winter time, and we knew we would get more plants in the ground in the spring.
[caption id="attachment_9066" align="aligncenter" width="640"] January 2014[/caption]
[caption id="attachment_9064" align="aligncenter" width="640"]
January 2014[/caption]
[caption id="attachment_9064" align="aligncenter" width="640"] January 2014[/caption]
In April of 2014, we got right to work. Last year was our first real garden experience in this house. It was a ton of work planting and planning and researching, but it was fun, too. We involved the kids in the raised beds planting, and they really enjoyed it. (my husband, my dad, the green thumb of the family, and myself planted most of the plants in the main beds)
January 2014[/caption]
In April of 2014, we got right to work. Last year was our first real garden experience in this house. It was a ton of work planting and planning and researching, but it was fun, too. We involved the kids in the raised beds planting, and they really enjoyed it. (my husband, my dad, the green thumb of the family, and myself planted most of the plants in the main beds)