01 Aug DIY Tutorial: Ombre Chest
Just as promised yesterday in my post, I am revealing my ombre project today. Not everything went quite as planned, but I do have a “before” and an “after”, and that’s what counts, right?
After all, I was contending with this party while trying to paint.
Several months ago, I purchased this chest for Gypsy Soul. But the more I looked at it, and the more I put my house together, the more I realized, “This would be so awesome for craft/art storage in my future office!” It is Drexel from the “Passage” line, so of course, the quality is excellent. Pretty hardware, too.
I debated about what to do with it…wallpaper the drawer fronts? Paint it and do an awesome nailhead pattern? (I SO want to do this eventually!) After some thought, and thinking about my vision for the my future office/guest room…inspirational, creative, colorful but not overdone, calming, happy…I decided ombre was the way to go. It makes me think of a painter’s mixing board or palette.
First things first, prep work! I sanded the whole chest with a medium grit sandpaper.
To remove the dust, I usually use cheesecloth, but I couldn’t find it, and guess what! A good ‘ole paper towel worked great, too. But cheesecloth probably does a more thorough job – you can buy it at any local hardware store.
Then I made sure all of the leaves and spider webs were cleaned out of corners and crevices. This is an important step to keep your paint and utensils clean and free of debris.
Tip: Before I take drawers out of a chest, especially older ones whose parts get rather attached to their spaces, I number the drawers. I just wrote the numbers on the underside of each drawer so they would be inconspicuous.
Next step was to remove the hardware. And here was my first mistake. After I removed the hardware, I did not dust out the indention from the absence of hardware. When I started painting, I got so frustrated because I could not figure out why I was having to clean dust and dirt out of my foam roller, and then I realized its source. Argh! All that to say, after removing hardware, clean out the crevice.
I have to tell you, I almost always brush paint or paint roll my furniture. However, Jenny, who writes one of my most favorite blogs, always uses foam rollers, so I thought I would give it a try. Although I liked it because it forces you to make thin coats (like you’re supposed to do), I found the coverage to be a bit complicated. It can look streaked if you aren’t careful, and I definitely had to do more coats. Five instead of the typical two or three. The finish is more matte than I usually prefer, but all in all, I would try it again. Perhaps with a different texture of foam roller.
You can see what it looks like after coat #1. The first coat is always a little scary because you hope it looks smooth and covered when you are finished with the entire process.
And after coat #3.
I did have a sweet little helper.
As I stated yesterday, when you are ombre painting this type of furniture, I think it looks best to paint the frame cream or white. For this project, I just used the trim paint color I already owned. In fact, all of the paint I utilized for this project was recycled.
A little side tip about painting…do you know about or use “Press’N Seal”?
I love this product for many reasons, but did you know it works wonderfully as a paint liner? For a few cents, you can carefully place this in the bottom of your metal or plastic rolling tray. Then when you are done with it, pull it up and throw it away! Since I employed several different hues for this piece, using the Press’N Seal was a lifesaver for me. Plus I seem to always forget those liners when I am shopping for items I need for my latest undertaking.
Back to painting, enter second mistake. Because I decided to use paint I already owned for this exercise, I picked a pretty shade of blue (Benjamin Moore, Jamestown Blue). I planned to start with the bottom drawer, making it the Jamestown Blue color, gradually adding white to create lighter colors, building to the top drawer. I even had a cute little plan to fade the color. Since I like things to be orderly, and processes to be organized, I began to pull together items to set my plan in motion. First, I retrieved a gift from my wedding registry that I have never used.
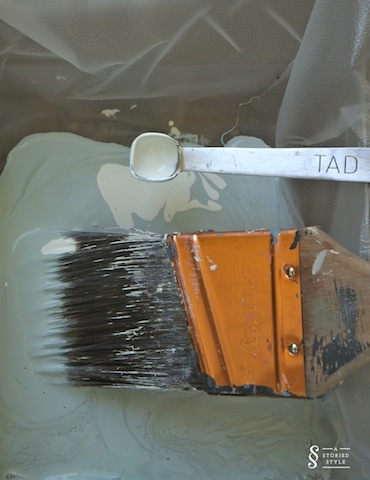
Aren’t they cute? I thought so too eight years ago, but until now, have never used them. I thought it would be a good idea to add white to the blue using the spoons and make a chart for how I varied the shades. See, I even took a sweet picture.
Unfortunately, after a few strokes, I realized something was wrong with the texture of my paint. It was very gloppy and stringy looking. I searched the can quickly to figure out what the problem could be, and immediately discovered it. 2005. I bought the paint in 2005, and it was past its prime.
On to Plan B.
Rummaging through my paint cans, I pulled my favorite light blue (Benjamin Moore, Palladian Blue), and gray blue (Benjamin Moore, Wedgewood Gray). I also grabbed a can of black paint I had (to make the blues darker), and the cream trim paint I had used for the frame of the chest (to make the blues lighter). Sadly, I do not have a scientific formula to create the colors. All I can say is, play with it. If you really want to make this project simple, go to the paint store, grab a paint chip you like, and buy sample sizes of the shades you prefer.
The foam roller making such thin coats was nice because once I finished a coat on the entire piece, it was dry enough that I could go ahead and do the next coat. And by the way, it was so hot here today I finished this in the kitchen.
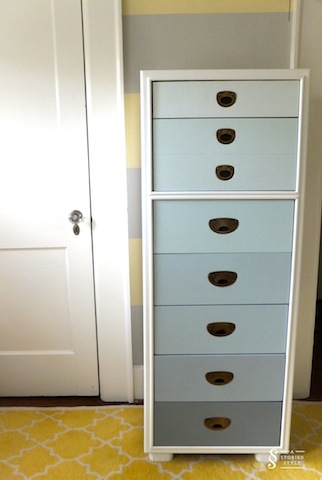
Ready for the big reveal?
One last gratuitous before & after.
What do you think? Will you try ombre painting?


muffet
Posted at 09:13h, 01 AugustI love it! I never knew ombre could look that way, like something I wan in my home. It turned out great! Wanta sell it now? 😉
Grace
Posted at 18:02h, 01 AugustThanks so much, Muffet! It was a fun little project. Ha, I’m not selling it…yet! I find my home to be a bit of a revolving door though. Keep your eye out. 😉
Whitney Thompson
Posted at 20:55h, 01 AugustI love how that chest turned out!!
Grace
Posted at 21:51h, 01 AugustThanks Whit! I’m happy with it! I was worried it was going to look too “little kid” if the colors didn’t come out right, and I think it has just the right amount of sophistication. Glad you like it. 🙂
Kat
Posted at 17:48h, 03 AugustI love this style. I even found it on a business card template over on tinyprints.com. How fun! If you want to check out the Vertical Spectrum design, the link is below.
http://www.tinyprints.com/business/product/29908/business_cards_vertical_spectrum.html#color/03/pid/29908
Grace
Posted at 21:45h, 04 AugustKat, this is so cool! Very pleasing design.